
Prawns, turkey, ham, roast vegetables, plum pudding, lashings of custard – you’ve gotta love a good Aussie Christmas lunch. The one that leaves you feeling like you couldn’t eat another thing for a week but has you coming back for leftovers for dinner, after a game of cricket in the backyard and a good nanna nap of course.
But before you start tucking into your Christmas feast, if your family is anything like mine, you’re probably going to pop a cracker with the person sitting next to you. This particular tradition creates just as much mess, chatter and laughter as present-opening and the wrapping paper that litters the loungeroom floor. I for one am very grateful for the fact that Tom Smith, a sweet maker in the UK back in the 1840s, thought of the idea of creating a noisy popping cracker that would make opening his paper-wrapped sweets a bit more entertaining for his customers.
But oh, the rubbish commercially-bought bonbons contain! The excitement of popping the bonbon in the first place is soon replaced with disappointment at the plastic rings, little bits of cardboard with word search puzzles and throw-away trinkets in them. Not to mention the cost!
Bonbons have a very special place in my heart as my beautiful mother used to make them each year for our family. She started making her own as she, too, was put off by the commercial ones because of the expense and the fact that they contained, well, nothing really. So she made her own, with thoughtful contents and personalised gifts and always, always with much love. I think she created a bit of a rod for her own back as, each year, she used to worry about what to put in them that was different and unique, but ultimately she came up with very special gifts, either relating to Christmas or to the individual (I’m remembering the cross-stitched keyring she made one year).
So, I now make them for my family, carrying on the tradition my mum started almost 40 years ago. And yes, I agonise about what to put in them too!
Here’s how I do it.
What you need (one for each person):
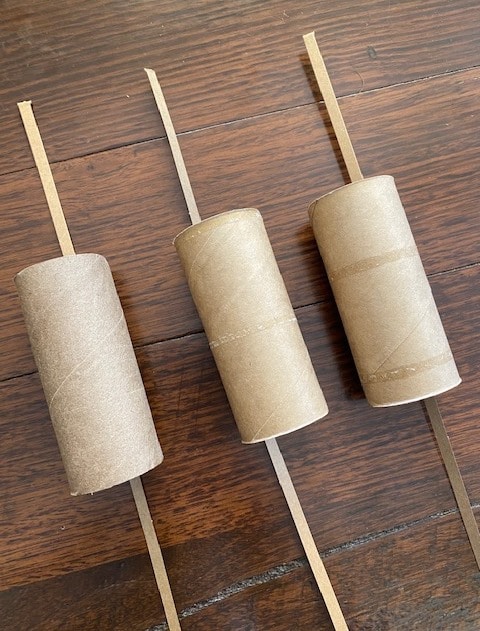
- Toilet rolls – save for as long as you need to, one per person plus one extra. Cut the extra one in half through the middle (around the circumference, so you have two round halves).
- Crackers – you can buy them from Spotlight or Riot Art (around $3 for a pack of 12).
- Wrapping paper – I suggest a thin Christmas paper or tissue paper, something that’s thin enough to pull apart when the bonbon is cracked open. Frankly, I don’t mind if the paper doesn’t tear when pulled apart – you can just rip it open when the cracker is pulled. But go to town on the theme – choose a colour that matches your table or tree. Have fun with the creativity of matching paper, ribbon, tag or embellishments. Cut it into squares, wide enough to roll up your toilet roll but longer than the length of the roll (you’ll roll the one with the gift in the middle, and the two halves as well, one at each end).
- Crepe paper for party hats
- Scratch tickets
- Printouts of jokes, cut up individually – get them from a Google search on the Internet (pick your audience – keep ‘em clean!).
- A gift for each person.
- Optional: holly, some greenery or whatever embellishment you want to add, which matches in with your theme.
- Curling ribbon – to tie each end of the bonbon (two lengths per bonbon).
Plus:
- Sticky tape
- Gluestick
- Scissors
- Name tags or stickers for names.
A word about gifts:
This is where you can really personalise your bonbon and, if you love to make, add the beautiful, special value that ‘handmade’ brings to a gift. Whether you make or buy your gifts, make them specific to the person or give gifts for the girls, gifts for the boys, and gifts for children (boys or girls). Make sure whatever you choose to give will fit inside the toilet roll when rolled up with the party hat, scratch ticket and joke. Too big and they won’t fit (I’ve been known – with some frustration and/or desperation – to wrap a gift separately and put it at the place-setting).
Ideas for ladies: nail polish, mascara, lipstick, lip balm, small items of jewellery (a favourite of mine, of course), moisturisers, keyrings.
Ideas for men: little torches, pens, penlights, beaded bracelets (again, yep), keyrings, tie pins, bottle openers, cufflinks.
Ideas for kids: the possibilities are endless; just look for little toys, hair ties, Matchbox cars, bubble bath etc.
Ideas for everyone: personalised Toblerones (you have to wrap these separately), movie or theatre tickets, massage vouchers, gift cards.
Step 1:

Gather all your elements together. It’s best to cut all your lengths of wrapping paper and curling ribbon, and get organised with everything sorted and in order before you start. It’s a bit of a production line when you get into it, especially if you’re making a lot.
Make your party hats. Cut crepe paper into lengths about three inches high (try to estimate sizes approximately – for the ladies, men and kids), stick ends together with gluestick and, using either pinking shears or scissors, cut crown-like points in the hats.
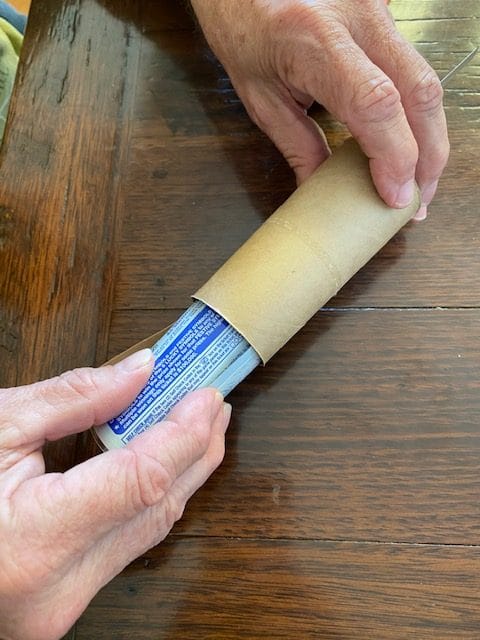
Using a small piece of sticky tape, tape the cracker to the inside of the toilet roll holder (don’t put the tape over the cracker itself, but on the cardboard stem), just so it doesn’t fall out.
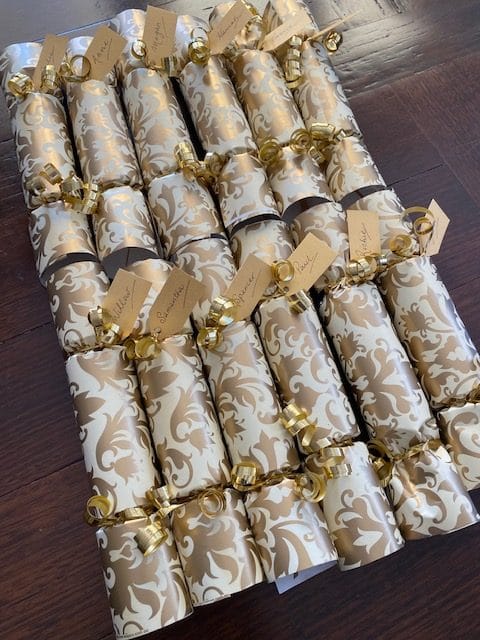
Consider how you’ll identify your guests’ names on the bonbons. They can be a gorgeous place-setting option. You can make tags to tie on the bonbon when tying up the ends, attach stickers with a Christmasy theme or just write the initial of the person inside one end to keep it subtle.
Step 2:
Layer the following: party hat (fold in half lengthwise), scratch ticket, joke, gift. Roll up into a tight roll.

Insert into one of the toilet rolls. (Hubby, Paul, pictured here giving me a hand!) You can add a piece of sticky tape across each end to hold everything in place so it doesn’t fall out, if necessary.
Step 3:

Add one half of the cut toilet roll holder to each end and place the three pieces onto a piece of wrapping paper. The two pieces of cardboard at each end help to keep the paper cylindrical as you tie-off each end, otherwise the paper scrunches up.
Roll all three together to wrap up, and secure the raw end of paper with sticky tape.
Pull out the two half ends of toilet rolls just a little – don’t pull them out completely yet, but just add a space of a couple of centimetres in between the middle one that contains the gift and the two ends, to make it easier to tie.
Take a piece of curling ribbon and tie up one end – add the tag or embellishment at this point if you’re using them.

Note: This is the trickiest part. The wrapping paper may tear – this is frustrating – but persevere and gently pull in the ribbon so it’s tight enough that the contents don’t spill out, but not so tight it tears the paper. (Sometimes another pair of hands is good for this part, to help hold the two parts and push the middle and end together as they tighten up when you pull the ribbon tight.)
Tie up the other end. Trim the ends of the cracker if they are too long. Curl the ribbon. Pull out the two ends of cardboard.
If you didn’t add a tag, make sure you write the name or initial of the person for each bonbon, just inside the end, so you know whose is whose.

That’s it – you’re done! Congratulations on making something personal, handmade and lovely for your family and friends, which so much more value than the purchased bonbons – and made with love, of course. I’m sure everyone will appreciate your efforts!
JS xx